Experiential Design Task 2
Melvin Yung Khun Yew | 0357241 | Bachelor of Design (Hons) in Creative Media
MMD 60204 | Experiential Design
Week 5 — Week 7
Task 2: Experience Design Project Proposal

|
| Developing Ideas: AR app "BodyBuddy" |
These are the jump links to each part of this portfolio
Instructions
Mr Razif Mohammed, my lecturer for the Experiential Design module for this April 2025 semester, gives us a heads-up on the upcoming tasks and exercises.
Lecture & In-class exercise
By creating a CS script file to execute a custom command to navigate to the other scene and attach it to the button, we're able to interact with our different screens.
In the Player Settings, set the company name (Your name) and the product name.

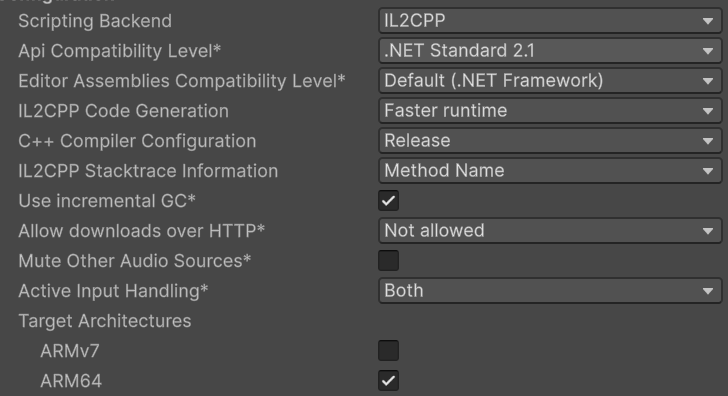
make sure its "IL2CPP" for scripting backend and check the box on ARM 64
Unity App Build & Run Debugging Aftermath
If you got issues with the greyed out Run Device and its telling you to set Android OpenJDK, but the OpenJDK is missing when searching in Edit > Preferences > External Tools > OpenJDK.
Here's what you should do for reference:
1. Installing OpenJDK Version 17.0.9.9 and NDK version r27c (for Unity version 6000.0.47f1) if you have compatibility issues with JDK and NDK.
JDK Download page: https://www.openlogic.com/openjdk-downloads
2. If there's an issue with CMake error when building and running again in Unity, make sure that CMake is in the SDK folder and the Ninja exe Path
Windows: Search Environment Variables > Edit PATH > Add new path for your newly downloaded Ninja.exe folder (C:\ninja) > DONE > Restart Unity and try again
OR
Just paste the Ninja.exe to the "SDK\cmake\3.22.1\bin" folder and it should work.
Work Process
In this task 2, I'm working together with my other teammate,
Lin Si Yan, to expand on our selected idea from task 1.
In my blog, I'm going to share my contributions to this design
project proposal that I've remembered.
For a comprehensive project proposal document, please refer to
the submission section.
Project Objectives
I stated our project objectives based on the problem statement to set a clear goal for our project, ensuring a coherent workflow later on.Competitive Analysis
To develop and compile our final design proposal, I began by conducting a competitive analysis on the existing app that provides a similar experience to our idea. From the analysis, I witnessed how they provide educational experience to the users, learned from them, and spotted opportunities from their app to expand and cater more target audience.User Journey Maps
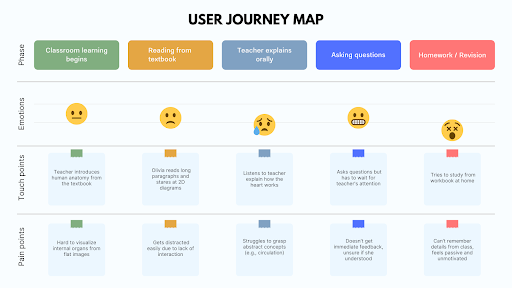
I also constructed 2 user journey maps, focusing on the experience of our primary target audience: primary schoolers. One of the user journeys explains about Olivia, a primary school student from the user persona we made, of her learning experience in class without using our "Bodybuddy" app, sharing her frustrations at each phase. On the other journey map, we presented how our app can provide her with solutions and gain points for her previous struggles, while noting possible pain points arising from the app.
|
| User journey before the app was introduced |

|
| User journey map when the app is utilized |
Continuous Discussion & Communications
I have communicated with Lin Si Yan together each week, either in class or through WhatsApp, about our ideas and how we could expand them to be a more comprehensive application by adding new features that match with our project objectives. Our application is not a one-time idea, but a continuous refinement process that happens until the end of our second task.
App Wireframes
As I'm focusing on designing and wireframing our app
prototypes, I took on constructing our app lo-fi wireframes,
detailing each of our intended features. The wireframes ranged
from the homepage to tutorial pages, features, and result
feedback.

|
| Homepage, Learning Mode Features |

|
| Assembly mode |

|
| Assembly mode, Quiz mode |
User Wireflow Diagram
Originally, we wanted to follow the template to create a user flow map. However, after discussing with my teammate, we decided to make it into user wireflow diagrams, which we learned from the other module: Application Design II (we have the same lecturer, Mr Razif, between the experiential design and application design II module :3)The reason we selected a user wireflow chart instead of a usual user flow map is that it can be more visually engaging for others to view and understand what's actually happening and what the interactions are on the screen.

|
| First version of user wireflow chart |
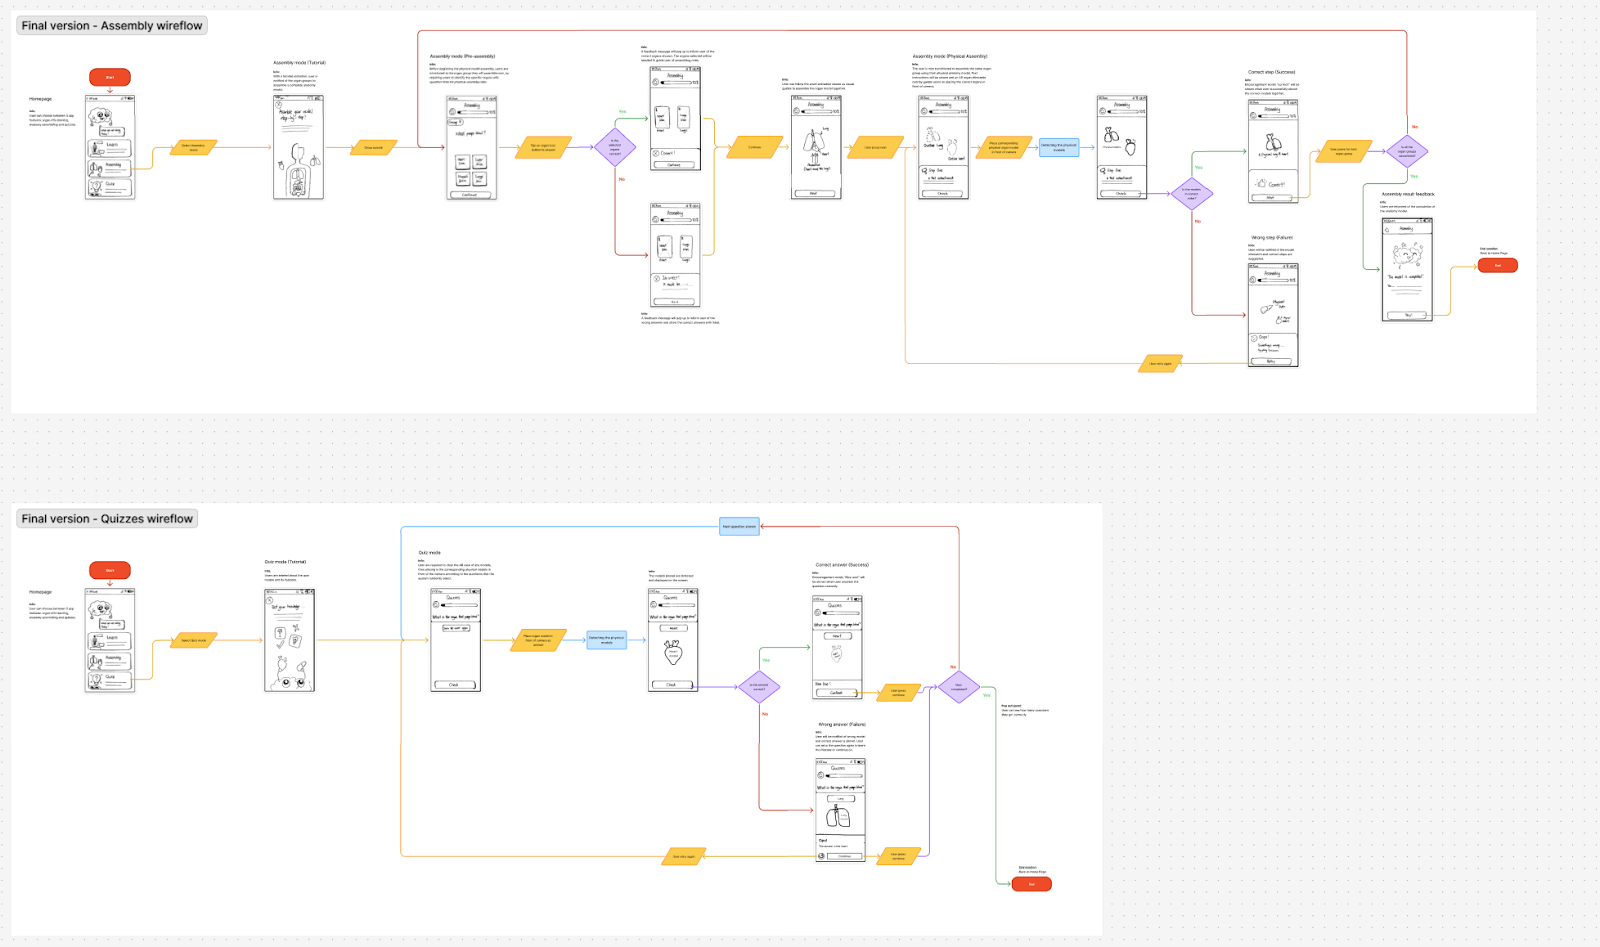
Our user wireflow diagrams have been separated into 3, each focusing on one feature in our app: learning mode, assembly mode, and quiz mode.
With my teammate's cross-check with the wireflow, we found ourselves having several issues in our wireflow, thus we progressed to refine our wireflow diagram better.
|
| Refined version of the user wireflow chart |
View User Wireflow
UI Components
Following our moodboard for references and inspirations, I created various versions of app UI elements that suit the theme of our project. Realizing that my previous work from other modules has visual elements that can fit into our project, I suggested my ideas to Si Yan, and we quickly implemented them into our app, which is a friendly brain mascot that may visually aid the kids when interacting with our app.

|
| App UI Design |
Draft Mockups
Before we conducted any of the wireframes and cooperative prototype development, I had made mockups personally for a quick visualization to explain to our lecturer better.

|
| Draft design mockups ─ Homepage, Learning mode |

|
| Draft design mockups ─ Assembly mode with feedback |

|
| Draft design mockups ─ Quiz mode with feedback |
Final App Prototype
Based on my wireframes, Si Yan and I initiated our app prototype development, or so-called mockups. While she assigned our task to break down our workflow into two parts for better management, I took on the duty to develop two of our app features, Assembly mode and the Quiz mode. During our development, we cross-checked with each other to ensure a consistent design throughout our app.

|
| Final prototype ─ Anatomy model assembling features |

|
| Final prototype ─ Quiz features |
View App Prototype
Interact with our "BodyBuddy" app!
Feedbacks
To ensure our ideas fit
better and are more compelling, we have requested professional
feedback from Mr Razif every week, and made changes based on his
suggestions and constructive feedback that guide and propel us
to evolve our proposal.
Submission
Google Drive
Proposal Doc
My reflections
Task 2 was a meaningful continuation of our AR journey, where my teammate Lin Si Yan and I collaborated to develop a complete and well-structured proposal for our educational AR app, BodyBuddy. Expanding on our selected idea from Task 1, I took the initiative to define clear project objectives, ensuring that every design decision aligned with our goal of making anatomy learning fun and accessible for children. Through competitive analysis, I learned how existing educational apps approach user experience, which helped us identify unique opportunities to enhance our concept. Constructing two detailed user journey maps — one showing a student’s learning struggle without BodyBuddy, and the other showing the benefits of using it — allowed us to empathize deeply with our target users.
Throughout the process, Lin Si Yan and I communicated regularly, brainstorming and refining our features based on ongoing feedback. I led the design and wireframing process, translating our features into low-fidelity wireframes and UI mockups that evolved through multiple iterations. We complemented each other’s work, cross-checking design consistency while developing different parts of the prototype. We also actively sought weekly feedback from Mr Razif, whose guidance helped us sharpen our proposal and push our ideas further. Looking back, this task not only improved my technical and UI design skills but also strengthened my ability to work collaboratively, think iteratively, and design with empathy and purpose.


Comments
Post a Comment