Digital Photography and Imaging | Final Project
Digital Photography and Imaging September 2023
This portfolio consists of:
Click on the link to jump to that part of the portfolio
↑↑↑ Back to top ↑↑↑
Lecture
Week 10 Intro to After Effects

|
| Creating "Surfing" with multiple layers in Photoshop |
- Select > Modify > Expand selection by XX pixels
- Make selection > Edit Panel > Fill > Content-aware
- (Still got some black spots/imperfections?)
- Clone stamp tool > Alt-click a layer
- Edit > Puppet Wrap > Create pin
Week 11 Intro to After Effects

|
| Collage animation |
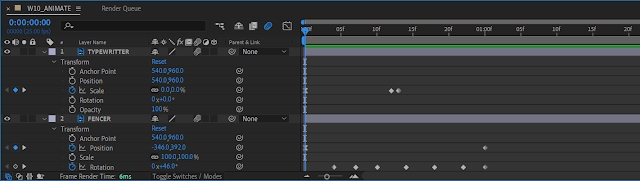
Importing the Photoshop composition into Adobe After Effects, I started to animate each individual layer using the transform sections to change the positions and the scale of the elements while utilizing the keyframe function to create a seamless motion.
 |
| Layer Panel |
Mr Martin taught us some of the functions inside the After Effects, which is the Motion Blur function

|
| Motion Blur |
Week 12 After Effects 2.5D parallax
In week 12, Mr Martin gave us a brief on how to use the camera layer in Adobe After Effects to create a 2.5-dimensional animation image.
Firstly, it's important to import the Photoshop (PSD) file to After Effects (AE) as composition and editable layer styles.

The learning objective of this exercise is to:
- learn about 2.5D animation
- easy skills: composition setting, keyframing and easy ease, motion blur, 3D in AE, and Export in AE.
- advanced skills: Camera, Orbit around cursor tool, Motion Tile.
I adjusted the composition settings of this project using Shortcut Key (Ctrl + K) to make changes to the framerates and the duration of the video.

Next, I created a new camera layer by clicking on the Layer panel > New > Camera.

For this exercise, I set the camera presets to 15mm.

For now, it's important to check the 3D Layer box for the layers to be visible and editable on the camera.

I changed the amount of camera views to two views to allow me to see another perspective.

To make the background move seamlessly and separate from the other layers, I moved the mountain background backwards using Z-axis movement and later scaled up the background to fill up the camera.


After that, I imported a fog video to enhance the visual of the animation, and I adjusted it by making it into a 3D layer, moving it in between the background and the subject and adjusting the opacity to blend into the background.


Later I created keyframes for the camera movement using the position adjustment layer panel to make the whole view look like the camera is zooming into the subject and panning to the right.

|
| Keyframing the camera movement |
To fill up the gap (black bar) beside the camera view, I applied the motion tile effects to the background and the subject layers.

|
| Motion Tile effect location |
In the motion tile effect panel, I checked the Mirror Edge box and increased the output width and height to fill up the gap between the subject and the view. The same effects are also applied to the background layer.

|
| Motion Tile effect controls |
The final step is to export and render it to output the final animation video.

|
| Render Queue |
Final Product
In this third and final task, I need to make a self-titled poster utilizing all the knowledge I've learned during this first semester, including from the Illustration and Visual Narrative and Typography module.
Cinemagraph of A4 integrated poster
- Generate and communicate design concepts and solutions through manual and digital skills effectively and skillfully.
- Use creative thinking skills and methodologies to explore, generate and test a wide range of conceptual ideas.
- Use information and communication technology to source navigate, select, retrieve and manage information.
↑↑↑ Back to top ↑↑↑
Work Process

|
| My biography |
From the biography, I noted down the keywords of myself such as:
- beauty and wonders of the human mind
- peace
- dreaming
- creations.

|
| Statement of my work |
Based on the statement, I commenced searching the suitable references including composition, and colour tones on the Internet, where I found these posters and images somewhat relevant to my ideas.

|
| Mood board (Poster Reference) |

|
| Sketch version 1 — 8/12/2023 |
However, I want myself to have the action of creating to match the keywords. Thus, here comes the second sketch:

|
| Sketch version 2 — 12/12/2023 |
After my sketch version 2 had been approved by both Mr Martin and Mr Hafiz, I moved on to the digitization process.
Digitization process


|
| Side face of myself |
I also came across different beautiful pictures of the universe (outer space) that correspond with my poster theme.


- Combining and shaping the blue energy trails (initially water trails)
- Light rays emitting out of the head
- 3D energy orb (using 3D effects inflate) on the hand
- Applying graphics on the 3D orb
- Adjusting the lighting of the orb
- Making gradient background
- Selecting and masking out the excess part of the photo (portrait photo, materials)
- Auto-tone and colour the portrait photo to match the background
- Making adjustment layers on the exposure and the curve of the whole image
- Double exposure of side face
- Adjusting blend mode and opacity of each layer.

|
| The first version of the poster composition |
In the first version of the poster, I noticed there is something off with the whole poster, it's the colour tone of the poster (blue, green, purple, yellow) doesn't complement each other. Thus, I made use of the colour theory and found out I should use warmer colours like orange, red, and yellow with the cool colour purple to create a better contrast. At the same time, there's a little too much going on in the poster.
- Colour tone
- Composition
- Creating and enhancing details of the energy trails
-
Applying gradient and texture effects (sprinkles
grain effect) on the trails
-
Smoothing and blending the edge of the light ray by
adjusting the opacity with the gradient tool
-
Illustrating anime eye
-
Adding pen trails and applying a 3D effect to it
-
Type modification for the title of the poster "endless"


- Adjusting the position of the elements
- Make use of foreground, midground and background concept
- Blend the bottom part of the double exposure side face to the background

|
| The second version of the poster composition |
After consulting with Mr Martin, he suggested I change the colour of the title to make the text pop a bit more. Thus, here comes the final version of the poster:

|
| The final version of the digital A4 poster — 24/12/2023 |
Post Production

|
| Adobe After Effects 2024 |
|
|
| CC Vignette effect on the panel with keyframes |
First thing first, I went to try out the camera movement focusing on the parts of the poster after making all the layers into 3D layers. I planned on making the whole video a loop starting and also the ending scene by focusing on the energy orb floating on the hand and quickly zooming out/into the whole picture.

|
| Camera movement adjustment |
- The light ray on the head
- The anime eye frame-by-frame
- The floating orb "Orb of Creation"
- The energy trails around the orb
- The moving hand and pen trail
- The comets flying by
-
Headlight ray animation|
I played with the scale transformation and Z rotation transformation on the light ray layers to enhance the visual and strengthen the illustration's purpose as a light.
-
The anime eye frame-by-frame animation
I had prepared multiple layers of the eye with different states (fully opened, half opened, fully closed) to adjust the opacity of the eye between 0% and 100% and make the eye animated.
-
The floating orb "Orb of Creation" animation
"Orb of Creation" There are two separate layers for the floating orb, one of them is the orb itself and another layer is its light ring.
I adjusted the floating orb's opacity at the start and end of the camera movement with the light ring having higher opacity than the orb itself (20% - 80% opacity level on the orb).A clearer outline of the orb at 80% opacity
I made a keyframe animation on the position of the floating orb to make it have a floating effect on my hand with the help of the easy ease transition.
In the meantime, I also applied a glow effect on the light ring layer to make the lighting a bit more realistic.
-
The animation on the orb's energy trails
Energy trails with orange-green gradient
To make the energy trails with a massless and flowing effect, I played with the Z-axis rotation and the left and right movement by also applying the easy ease transition to ensure smooth movement.
Transformation of the layers' position and rotation
-
The animation on moving hand and pen trail
Pen-holding hand with trail emitting from the pen tip
To make the whole poster animation look more lively, I included a waving hand movement using the Z-axis rotation and the easy ease transition for smoother action.
At the same time, I also applied the same movement on the pen trail to match with the hand action.
-
The animation on flying comets
There are two types of flying comets:
- Overtext (foreground) comet
-Background comets
For the foreground over text comet, I placed the comet layer on top of the title layer and later adjusted the movement of the comet from the right side of the poster to the left.
As for the background comets, I simply placed the comet layers behind the double exposure side face layer.
To create a distance and space effect, I modified the size of the comet which the foreground comet is larger than the background comets.


Final touch-up of the video
To convey the message of the poster better, I searched for music that contains a vast, endless and dreamy feeling.↑↑↑ Back to top ↑↑↑
Final Work

|
| "Endless" — 24/12/2023 |
↑↑↑ Back to top ↑↑↑
Reflections
-
Experience
For this final task combining all the challenges from different modules like Illustration and Visual Narrative (IVN), Digital Photography and Imaging (DPI) and Typography, I'd say it's quite a thrilling experience for me to utilize all the knowledge I've learned during the first semester and apply them together to produce a integrated poster and a cinemagraph poster. I'm glad that all the skills I've acquired in the class can be put together to create a poster that describes myself using visual means only.
-
Observations
As instructed and requested by my lecturer to look at the examples on the Internet, I'm able to appreciate the enthralling work of art by the professionals, they make me wonder how capable our human mind is.
-
Findings
Not only the information from the module can help me achieve a greater height in my creative design voyage, but the experiences and samples portrayed by others make me realize that there is always someone more capable and stronger than us, all we can do is not hoping for the best, but wishes for improvement as times goes.


Comments
Post a Comment